
If you’ve ever craved that iconic Pick Up Stix house special chicken with its irresistibly crispy coating and glossy sweet-savory sauce, you’re in for a treat.
This copycat Pick Up Stix house chicken recipe brings the beloved restaurant favorite right to your kitchen. With tender chicken pieces enveloped in an ultra-crunchy shell and glazed in a luscious honey-soy sauce, this homemade Pick Up Stix house chicken delivers authentic flavors and that signature texture you love.
The secret? A unique double-frying technique and a special starch coating method that creates those wonderfully crispy nuggets that stay crunchy even after saucing.
What Does Pick Up Stix House Special Chicken Taste Like?
The house special chicken recipe offers a beautiful harmony of flavors and textures. Each bite delivers an audible crunch that gives way to juicy, tender chicken.

The sauce provides a balanced sweetness from honey and brown sugar, cut through with tangy ketchup and vinegar, while soy sauce adds depth and umami richness. Roasted sesame seeds contribute a nutty aroma, and a final drizzle of sesame oil brings everything together with fragrant, toasted notes.
The chicken itself is well-seasoned with garlic and maintains incredible moisture despite the crispy exterior. It’s comfort food at its finest sweet, savory, crunchy, and utterly addictive.
Ingredients for Pick Up Stix House Chicken
For the Chicken:
- 1 lb. chicken breast (sliced 1/3 inch thick)
- 1 tbsp. finely minced garlic
- 2 tsp soy sauce
- 1/2 tsp salt
- Black pepper to taste
- 1/3 tsp baking soda
- 1 egg
- 3 tbsp. sweet potato starch (for marinade)
- Sweet potato starch (for coating; coarse preferred)
For the Sauce:
- 2 tbsp. honey
- 3 tbsp. brown sugar
- 2.5 tbsp. soy sauce
- 2.5 tbsp. ketchup
- 1 tbsp. Chinese black vinegar (or white vinegar)
- 3.5 tbsp. water
- 2 tsp starch (mixed with water for slurry)
For Finishing:
- 1.5 tbsp. roasted sesame seeds
- Drizzle of sesame oil
- Sliced scallions (optional for garnish)
Kitchen Tools You’ll Need
- Sharp knife
- Mixing bowls
- Wok or deep fryer
- Strainer/sieve
- Whisk
- Large container (for starch coating)
- Cooking thermometer
- Chopsticks or tongs
Preparation and Cooking Time
Prep Time: 30 minutes
Resting Time: 30 minutes
Cook Time: 20 minutes
Total Time: 1 hour 20 minutes
Yields: 3–4 servings
Pick Up Stix House Special Chicken Recipe Instructions
Step 1: Marinate the Chicken
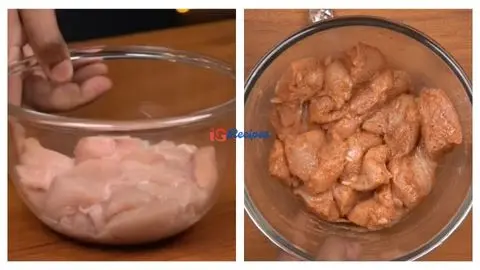
In a mixing bowl, combine chicken slices with finely minced garlic, soy sauce, salt, black pepper, baking soda, egg, and 3 tablespoons of sweet potato starch. Mix thoroughly until all chicken pieces are well-coated. Cover and let marinate for 20 minutes at room temperature. The baking soda tenderizes the meat while the starch helps create a velvety coating.
Step 2: Create Clumpy Starch Coating
Spread sweet potato starch in a large, flat container. Lightly spray the starch with water using a spray bottle, then wait 20 seconds for moisture to absorb. Use a whisk to fluff and break up any clumps. Repeat this spraying and fluffing process 5 times until you achieve small, irregular clumps throughout the starch. This textured coating is the secret to maximum crispiness.
Step 3: Coat the Chicken
Add marinated chicken pieces to the clumpy starch one by one, ensuring they don’t stick together. Gently shake the container or use chopsticks to toss the chicken, allowing the starch to adhere naturally. Use a sieve to sift off excess loose starch. Let the coated chicken rest on a plate for 15 minutes this resting period allows the coating to properly bond with the chicken.
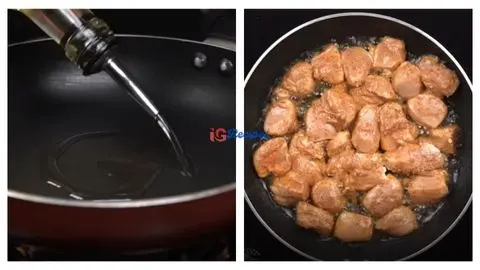
Step 4: First Fry
Heat cooking oil in your wok or deep fryer to 380°F (193°C). Carefully add chicken pieces in 2 batches to avoid overcrowding. Fry until just cooked through but not yet golden, approximately 3-4 minutes. Remove with a strainer and drain on a wire rack. Let the chicken sit for 15 minutes this crucial step softens the crust slightly and redistributes moisture for the perfect final texture.
Step 5: Prepare the Sauce
While chicken rests, whisk together honey, brown sugar, soy sauce, ketchup, and Chinese black vinegar in a bowl. In a separate small cup, mix 2 teaspoons of starch with 3.5 tablespoons of water to create a slurry. Add this slurry to the sauce mixture and stir until combined. Set aside.
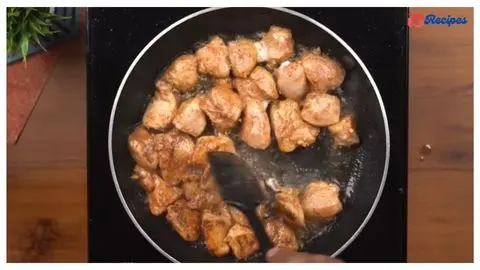
Step 6: Second Fry for Maximum Crisp
Increase oil temperature to 400°F (204°C). Return all chicken pieces to the hot oil for the second fry. Cook for 2–3 minutes until deeply golden and supremely crispy. The double-frying technique ensures an incredibly crunchy exterior that holds up beautifully when sauced. Drain thoroughly.
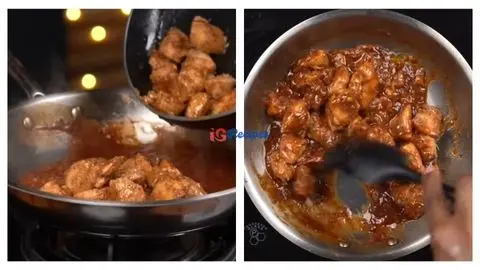
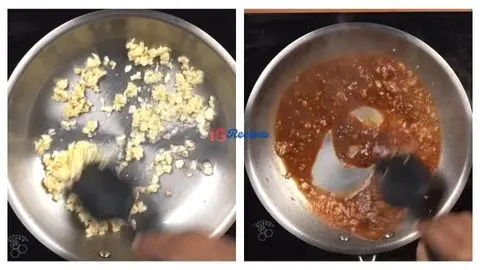
Step 7: Glaze and Finish
Pour out most of the oil from your wok, leaving just 2 teaspoons. Return wok to medium-high heat and add the prepared sauce. Stir constantly as it bubbles and thickens, about 1-2 minutes. Immediately add the crispy chicken and toss quickly to coat every piece evenly. Drizzle with sesame oil, sprinkle roasted sesame seeds over the top, and garnish with sliced scallions if desired. Serve immediately while hot and crispy.
Customization and Pairing Ideas for Pick Up Stix House Chicken
1. Spicy Kick Variation: Transform your house special chicken recipe into a fiery version by adding 1-2 teaspoons of chili garlic sauce or sriracha to the sauce mixture. You can also toss in dried red chili flakes with the sesame seeds for an extra heat dimension that complements the sweet glaze beautifully.
2. Orange-Glazed Twist: Create a citrus variation by replacing half the honey with fresh orange juice and adding 1 teaspoon of orange zest to the sauce. This bright, tangy version offers a refreshing contrast to the rich, sweet original while maintaining that signature crispy texture.
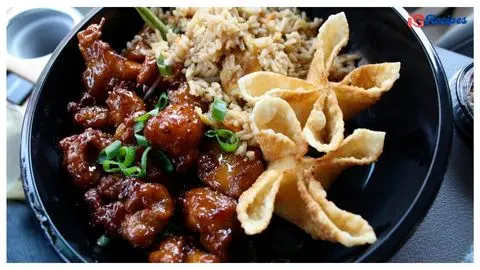
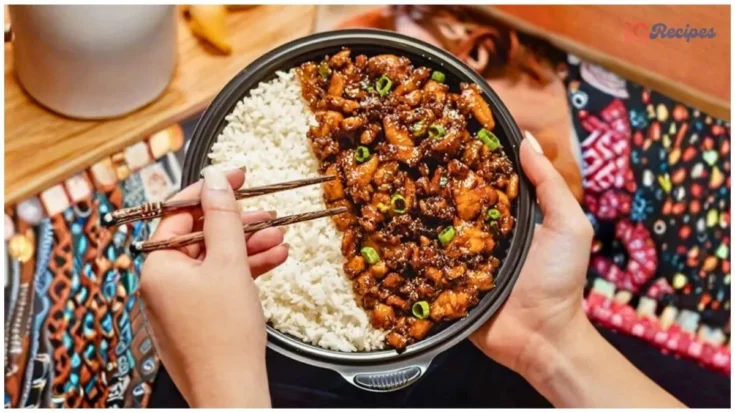
3. Serve Over Fried Rice: Pair your homemade Pick Up Stix house chicken with vegetable fried rice or egg fried rice for a complete meal. The savory rice absorbs any extra sauce while providing a satisfying base that balances the sweet chicken perfectly.
4. Spicy Kick with Fermented Habanero Hot Sauce: Transform your Special Chicken Recipe into a fiery favorite by adding 1–2 teaspoons of fermented habanero hot sauce to the sauce. The heat pairs beautifully with the naturally sweet glaze, giving your meal a bold, zesty flavor. Serve alongside barefoot contessa black bean soup or Yard House chicken tortilla soup as a starter for a well-rounded, spicy-themed menu.
5. Asian Slaw Pairing: Serve alongside a crisp Asian cabbage slaw dressed with rice vinegar, sesame oil, and a touch of sugar. The cool, crunchy, tangy slaw provides textural contrast and cuts through the richness of the fried chicken, creating a well-rounded plate.
6. Noodle Bowl Creation: Transform this dish into a noodle bowl by serving the chicken over lo mein noodles, rice noodles, or even ramen. Add steamed broccoli, snap peas, or bok choy for vegetables, and drizzle any remaining sauce over the entire bowl.
7. Citrus-Glazed Twist with Sweet Sides: Replace half the honey in your sauce with fresh orange juice and a teaspoon of orange zest for a bright, tangy flavor. Pair this version with pistachio ice cream or frozen yogurt for dessert. For extra indulgence, a small serving of buttercream frosting works perfectly for cupcakes or mini desserts, creating a sweet contrast to your citrusy chicken.
8. Lettuce Wrap Style: For a lighter presentation, serve the chicken in butter lettuce cups with julienned carrots, cucumber strips, and fresh cilantro. This deconstructed approach makes for an interactive, fresh-tasting meal that’s perfect for entertaining.
9. Veggie & Sauce Pairing Combo: Toss stir-fried broccoli, bell peppers, and baby corn with your chicken for a colorful, nutrient-packed dish. Serve with sauces like Ina Garten tomato sauce or Frisco Melt sauce on the side so guests can customize each bite. This pairing works well over fried rice or lo mein, making a complete restaurant-style meal with both vibrant vegetables and flavorful protein.
10. Bento Box Approach: Create a restaurant-style bento experience by portioning the chicken alongside steamed jasmine rice, edamame, pickled vegetables, and fresh orange slices. This presentation makes your copycat Pick Up Stix house chicken recipe feel even more special and authentic.

Essential Tips for Perfect Pick Up Stix House Chicken
1. Slice Chicken Uniformly: Cut your chicken breast into consistent 1/3-inch thick pieces to ensure even cooking. Uniform sizing means every piece will be perfectly cooked not overdone or undercooked. Place the chicken in the freezer for 15 minutes before slicing to make cutting easier and more precise.
2. Don’t Skip the Baking Soda: The baking soda in the marinade is crucial for tenderizing the chicken and creating that signature velvety texture. It raises the pH of the meat’s surface, helping it retain moisture during the double-frying process. Just don’t exceed the amount specified, as too much can create an unpleasant metallic taste.
3. Master the Clumpy Starch Technique: The irregular, clumpy texture of the coating starch is what creates those incredibly craggy, crispy bits. If you can’t find coarse sweet potato starch, the DIY spray-and-fluff method works perfectly. Take your time with this step it’s the difference between good and exceptional crispiness.
4. Maintain Proper Oil Temperature: Use a cooking thermometer to monitor oil temperature accurately. At 380°F for the first fry, the chicken cooks through without browning too quickly. At 400°F for the second fry, you achieve that golden, super-crispy exterior. Too-low oil results in greasy, soggy chicken; too-high oil burns the coating before cooking the inside.
5. Rest Between Fries: The 15-minute rest after the first fry isn’t optional it’s essential. This resting period allows the coating to rehydrate slightly from the chicken’s internal moisture, creating a tender interior layer while maintaining the structure needed for the final crispy fry. Skipping this step results in a coating that’s too hard and shell-like.
6. Prep All Ingredients Before Frying: Have your sauce completely mixed and your finishing ingredients measured and ready before you start the second fry. Once that chicken comes out golden and crispy, you need to work quickly. The sauce thickens fast, and you want to toss the chicken while both are hot for optimal coating and the best texture.
7. Serve Immediately for Best Results: While this Pick Up Stix house special chicken is delicious at any temperature, it’s absolutely transcendent when served within 5 minutes of glazing. The exterior maintains maximum crispiness while the interior stays juicy. If you must wait, keep the fried chicken in a warm oven (200°F) uncovered, and add the sauce just before serving to preserve the crunch.
8. Cook at High Heat for Crispy Perfection: Stir-fry or fry chicken in small batches over high heat. Overcrowding the pan can cause steaming, which reduces crispiness. Perfectly crisp chicken works especially well with sauces like fermented habanero hot sauce or Frisco Melt sauce.
Storage and Reheating Guidance
Store leftover Pick Up Stix house chicken in an airtight container in the refrigerator for up to 3 days. For best results, reheat in a 375°F oven for 8-10 minutes or in an air fryer at 350°F for 5-6 minutes to restore crispiness. Avoid microwaving, as it will make the coating soggy.
Pick Up Stix House Special Chicken Recipe
If you’ve ever craved that iconic Pick Up Stix house special chicken with its irresistibly crispy coating and glossy sweet-savory sauce, you’re in for a treat. This copycat Pick Up Stix house chicken recipe brings the beloved restaurant favorite right to your kitchen. With tender chicken pieces enveloped in an ultra-crunchy shell and glazed in a luscious honey-soy sauce, this homemade Pick Up Stix house chicken delivers authentic flavors and that signature texture you love.
Ingredients
- 1 lb. chicken breast (sliced 1/3 inch thick)
- 1 tbsp. finely minced garlic
- 2 tsp soy sauce
- 1/2 tsp salt
- Black pepper to taste
- 1/3 tsp baking soda
- 1 egg
- 3 tbsp. sweet potato starch (for marinade)
- Sweet potato starch (for coating; coarse preferred)
- 2 tbsp. honey
- 3 tbsp. brown sugar
- 2.5 tbsp. soy sauce
- 2.5 tbsp. ketchup
- 1 tbsp. Chinese black vinegar (or white vinegar)
- 3.5 tbsp. water
- 2 tsp starch (mixed with water for slurry)
- 1.5 tbsp. roasted sesame seeds
- Drizzle of sesame oil
- Sliced scallions (optional for garnish)
Instructions
Step 1: Marinate the Chicken
In a mixing bowl, combine chicken slices with finely minced garlic, soy sauce, salt, black pepper, baking soda, egg, and 3 tablespoons of sweet potato starch. Mix thoroughly until all chicken pieces are well-coated. Cover and let marinate for 20 minutes at room temperature. The baking soda tenderizes the meat while the starch helps create a velvety coating.
Step 2: Create Clumpy Starch Coating
Spread sweet potato starch in a large, flat container. Lightly spray the starch with water using a spray bottle, then wait 20 seconds for moisture to absorb. Use a whisk to fluff and break up any clumps. Repeat this spraying and fluffing process 5 times until you achieve small, irregular clumps throughout the starch. This textured coating is the secret to maximum crispiness.
Step 3: Coat the Chicken
Add marinated chicken pieces to the clumpy starch one by one, ensuring they don’t stick together. Gently shake the container or use chopsticks to toss the chicken, allowing the starch to adhere naturally. Use a sieve to sift off excess loose starch. Let the coated chicken rest on a plate for 15 minutes this resting period allows the coating to properly bond with the chicken.
Step 4: First Fry
Heat cooking oil in your wok or deep fryer to 380°F (193°C). Carefully add chicken pieces in 2 batches to avoid overcrowding. Fry until just cooked through but not yet golden, approximately 3-4 minutes. Remove with a strainer and drain on a wire rack. Let the chicken sit for 15 minutes this crucial step softens the crust slightly and redistributes moisture for the perfect final texture.
Step 5: Prepare the Sauce
While chicken rests, whisk together honey, brown sugar, soy sauce, ketchup, and Chinese black vinegar in a bowl. In a separate small cup, mix 2 teaspoons of starch with 3.5 tablespoons of water to create a slurry. Add this slurry to the sauce mixture and stir until combined. Set aside.
Step 6: Second Fry for Maximum Crisp
Increase oil temperature to 400°F (204°C). Return all chicken pieces to the hot oil for the second fry. Cook for 2–3 minutes until deeply golden and supremely crispy. The double-frying technique ensures an incredibly crunchy exterior that holds up beautifully when sauced. Drain thoroughly.
Step 7: Glaze and Finish
Pour out most of the oil from your wok, leaving just 2 teaspoons. Return wok to medium-high heat and add the prepared sauce. Stir constantly as it bubbles and thickens, about 1-2 minutes. Immediately add the crispy chicken and toss quickly to coat every piece evenly. Drizzle with sesame oil, sprinkle roasted sesame seeds over the top, and garnish with sliced scallions if desired. Serve immediately while hot and crispy.
Notes
Store leftover Pick Up Stix house chicken in an airtight container in the refrigerator for up to 3 days. For best results, reheat in a 375°F oven for 8-10 minutes or in an air fryer at 350°F for 5-6 minutes to restore crispiness. Avoid microwaving, as it will make the coating soggy.
Nutrition Information:
Yield:
4Serving Size:
1Amount Per Serving: Calories: 130
Common Queries and FAQs About Pick Up Stix House Chicken Recipe
Here, we’ve got you covered with some common questions about the Pick Up Stix House Special Chicken Recipe that people often ask.
Q: Can I use regular cornstarch instead of sweet potato starch?
While sweet potato starch creates the most authentic texture with superior crispiness and lightness, cornstarch can work in a pinch. The coating won’t be quite as crunchy or light, but it will still be delicious. Potato starch is the closest alternative if you can’t find sweet potato starch.
Q: Why do I need to double fry the chicken?
Double frying is the secret to restaurant-quality crispiness. The first fry at lower temperature cooks the chicken through, while the second fry at higher temperature creates that signature golden, extra-crunchy shell. The resting period between fries allows moisture redistribution for optimal texture.
Q: Can I make this recipe with chicken thighs instead of breast?
Absolutely! Boneless, skinless chicken thighs work wonderfully and may even be juicier. Slice them to a similar 1/3-inch thickness and follow the same process. You may need to add 1-2 minutes to the first frying time since thighs are slightly denser than breast meat.
Q: What if I don’t have Chinese black vinegar?
White vinegar, apple cider vinegar, or rice vinegar all work well as substitutes. Chinese black vinegar has a more complex, slightly smoky flavor, but regular vinegars will still provide the necessary acidity to balance the sweetness. Start with the amount specified and adjust to taste.
Q: How do I know when the oil is at the right temperature without a thermometer?
Drop a small piece of bread or a pinch of starch into the oil. At 380°F, it should sizzle immediately and gradually turn golden. At 400°F, it will sizzle vigorously and brown quickly. However, investing in an inexpensive cooking thermometer ensures consistent, safe results every time.
Q: Can I bake this chicken instead of frying?
While baking is healthier, you won’t achieve the same texture as the traditional double-fried method. If you must bake, coat the chicken as directed, place on a wire rack over a baking sheet, spray with cooking oil, and bake at 425°F for 20-25 minutes, flipping halfway. The result will be crispy but different from the fried version.
Q: Why is my coating falling off the chicken?
This usually happens when you skip the 15-minute rest after coating or when the chicken pieces are too wet from the marinade. Make sure to let the coated chicken sit undisturbed, and don’t overwork the pieces when coating. The starch needs time to hydrate and bond with the egg-coated chicken surface.
Q: Can I prepare the chicken ahead of time?
You can marinate the chicken up to 4 hours ahead (store covered in the refrigerator), and you can coat the chicken up to 1 hour before frying. However, the frying should be done fresh for optimal crispiness. You can complete the first fry up to 2 hours ahead, then do the second fry just before serving.
Q: What’s the best oil for frying this recipe?
Use a neutral oil with a high smoke point such as vegetable oil, canola oil, peanut oil, or sunflower oil. These oils won’t impart unwanted flavors and can safely reach the 400°F needed for the second fry. Avoid olive oil or butter, which have lower smoke points.
Q: How can I make the sauce thicker or thinner?
The starch slurry controls the sauce thickness. For a thicker glaze, add an extra 1/2 teaspoon of starch to your slurry. For a thinner, more coating-style sauce, reduce the starch by 1/2 teaspoon or add an extra tablespoon of water. Remember that the sauce thickens as it cools slightly.
Q: Is there a gluten-free version of this recipe?
Sweet potato starch is naturally gluten-free, which is great news! Simply replace the regular soy sauce with tamari or gluten-free soy sauce, and ensure your vinegar and other ingredients are certified gluten-free. The rest of the recipe remains the same.
Q: Can I freeze the cooked chicken?
You can freeze the chicken after the first fry (before saucing) for up to 2 months. Freeze pieces in a single layer on a baking sheet, then transfer to a freezer bag. When ready to serve, let thaw in the refrigerator, then proceed with the second fry and saucing. Don’t freeze already-sauced chicken, as the coating will become soggy.
This copycat Pick Up Stix house chicken recipe proves you don’t need to order takeout to enjoy restaurant-quality Chinese-American cuisine. With the right technique especially the clumpy starch coating and double-frying method you’ll create chicken that’s even better than the original.
The combination of crispy texture, tender meat, and that irresistible sweet-savory glaze makes this homemade Pick Up Stix house chicken a keeper recipe you’ll return to again and again. Gather your ingredients, heat that oil, and get ready to impress yourself and everyone at your table!
You can also follow us on Pinterest, and YouTube for more delicious updates and kitchen inspiration. Your feedback and support mean the world to us!