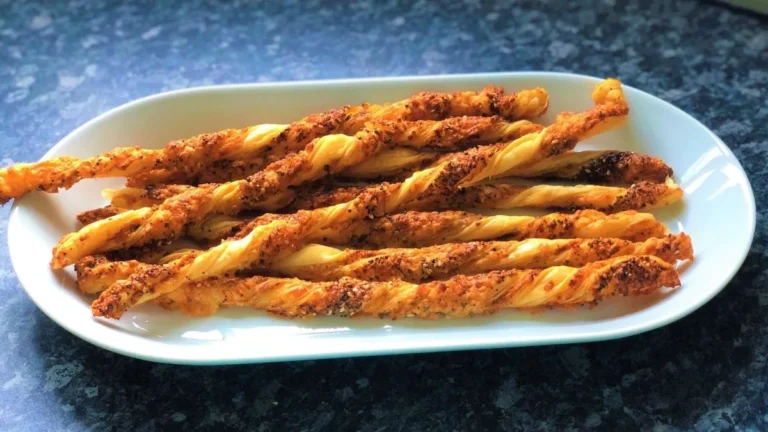
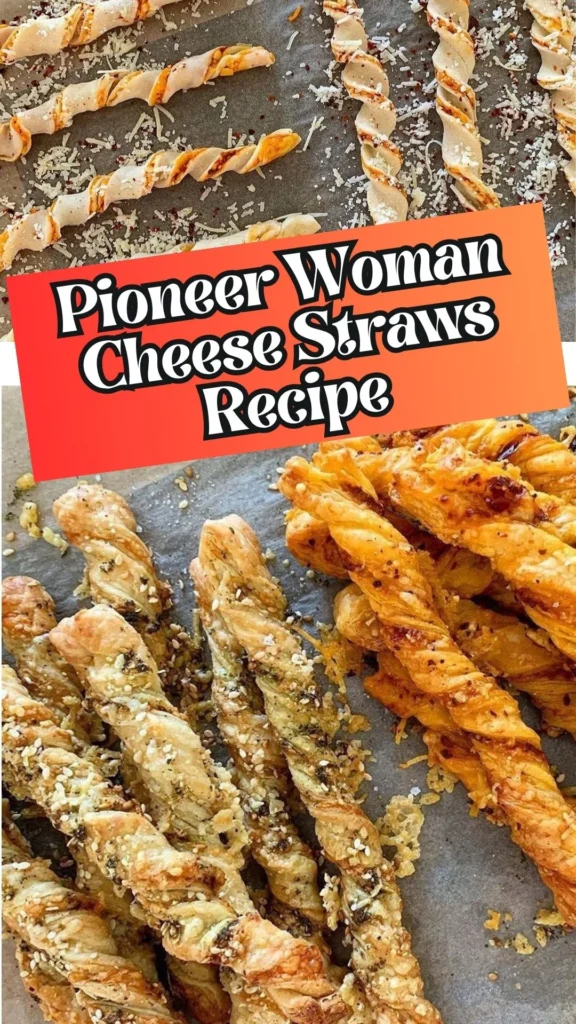
If you’ve been searching for the ultimate copycat Pioneer Woman cheese straws recipe, you’ve landed in exactly the right place! These golden, flaky cheese twists are the perfect balance of buttery puff pastry, sharp aged cheddar, and nutty Parmesan.
Whether you’re hosting a dinner party, need an impressive appetizer, or simply want a savory snack that disappears in minutes, learning how to make Pioneer Woman cheese straws will become your new favorite kitchen skill.
These elegant yet simple treats deliver restaurant-quality results with minimal effort, making them ideal for both novice bakers and seasoned cooks alike, especially when paired with pioneer woman smashed potato for a hearty touch.
What Does It Taste Like?
Imagine biting into a crispy, golden-brown twist that shatters delicately between your teeth. The best cheese straws recipe ever delivers layers of buttery, flaky puff pastry infused with sharp aged cheddar that melts into every crevice.
The Parmigiano-Reggiano adds a nutty, umami depth, while a hint of cayenne pepper provides just enough heat to keep things interesting. Each bite is savory, rich, and incredibly satisfying-like a sophisticated cheese cracker elevated to gourmet status.
The edges get extra crispy while the center remains tender, creating an addictive textural contrast that makes it impossible to eat just one.
Pioneer Woman Cheese Straws Ingredients You’ll Need
For the Cheese Straws:
- 1 sheet frozen puff pastry (thawed just enough to unfold)
- 2 teaspoons olive oil (preferably from canned anchovies for extra umami, or regular olive oil)
- Salt (to taste)
- Freshly ground black pepper (to taste)
- Cayenne pepper (to taste, for heat)
- ½ cup finely grated aged white cheddar cheese (sharp, hard aged variety)
- ½ cup finely grated Parmigiano-Reggiano (plus extra for topping)
Optional Variations:
- Dried herbs (rosemary, thyme, oregano)
- Smoked paprika
- Curry powder
- Garlic powder
Essential Kitchen Utensils
- Cutting board
- Microplane grater or fine grater
- Pastry brush
- Plastic wrap
- Pizza cutter or sharp knife
- Parchment paper
- Baking sheet
- Wire cooling rack
- Oven
Preparation and Cooking Time
- Prep Time: 15 minutes
- Cook Time: 20-30 minutes
- Total Time: 35-45 minutes
- Servings: 9 cheese straws (from 1 sheet of puff pastry)
- Difficulty Level: Easy
Pioneer Woman Cheese Straws Instructions
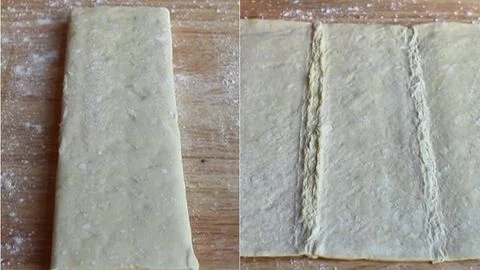
Step 1: Prepare the Puff Pastry
Place one sheet of frozen puff pastry on a lightly floured cutting board. Allow it to thaw just enough so you can unfold it without cracking-keep it as cold as possible for easier handling. Unfold the pastry completely (don’t worry about the seams; they won’t affect your final result).
Step 2: Season and Add Cheese
Drizzle or brush the entire surface evenly with olive oil, using anchovy-packed olive oil if available for extra savory depth. Season generously with salt, freshly ground black pepper, and cayenne pepper to your preferred heat level.
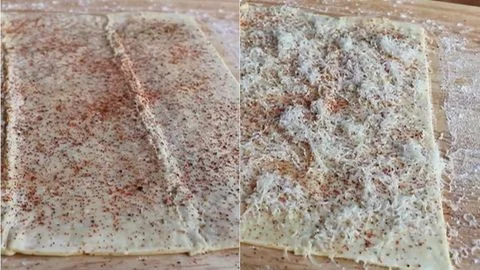
Using a microplane, finely grate the aged white cheddar over the entire surface, covering it completely. The cheese should look abundant-fine shreds create better adhesion. Follow with a generous layer of finely grated Parmesan.
Step 3: Press the Cheese
Cover the topped pastry with plastic wrap. Using your palms or the bottom of a flat pan, press down firmly across the entire surface. This crucial step helps the cheese adhere properly to the pastry and prevents it from falling off during twisting.
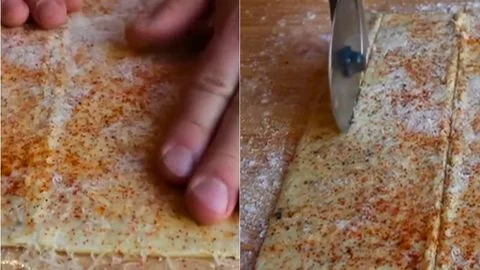
Step 4: Cut the Strips
Remove the plastic wrap. Using a pizza cutter (preferred for clean cuts) or a sharp knife, first cut along the existing fold lines to divide the pastry into three sections. Then cut each third into three equal strips, creating 9 total strips. For crispier straws, cut thinner; for softer, more bread-like texture, cut thicker.
Step 5: Twist the Straws
Flip each strip over so the seasoned, cheesy side faces down. Hold both ends of a strip and twist from the center outward, creating a spiral shape. Twist tighter for denser, crispier results, or looser for a softer texture. Try to keep the cheesy side facing outward as you twist for maximum visual appeal.
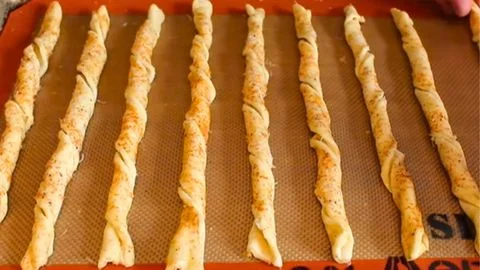
Step 6: Add Final Cheese Coating
Arrange the twisted straws on a parchment-lined baking sheet, spacing them about an inch apart. Finely grate additional Parmesan over the tops of all straws. Gently roll each straw on the sheet to pick up any fallen cheese-the soft, sticky dough will grab it beautifully.
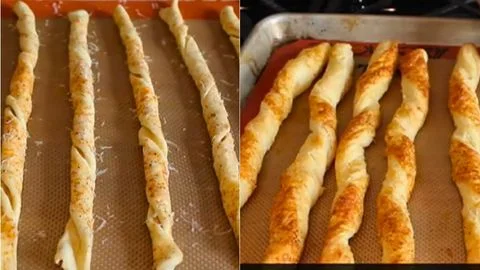
Step 7: Bake to Golden Perfection
Bake in a preheated 400°F (200°C) oven for 20-30 minutes total. After 10-15 minutes, carefully flip each straw over using tongs to ensure even browning and crisping on both sides. Continue baking until the straws are deeply golden brown and completely stiff. Test doneness by holding one up by the end-it should not droop at all.
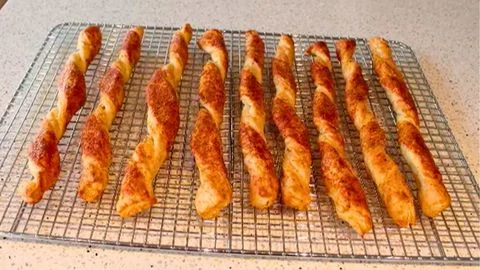
Step 8: Cool and Serve
Transfer the baked cheese straws immediately to a wire cooling rack. This prevents condensation from forming on the bottom, which would make them soggy. Let cool for at least 5 minutes before serving (though they’re also delicious warm).
Customization and Pairing for Serving Ideas
1. Mediterranean Herb Variation
Transform your cheese twists into a Mediterranean delight by adding dried rosemary, thyme, and oregano to the seasoning mix. Pair these aromatic straws with a creamy hummus or tzatziki dip, alongside fresh olives and cherry tomatoes for an elegant mezze platter.
2. Spicy Cajun Style
Crank up the heat by doubling the cayenne and adding smoked paprika and garlic powder. These bold-flavored cheese straws pair beautifully with a cooling ranch or blue cheese dressing, making them perfect game-day appetizers alongside buffalo wings and celery sticks.
3. Italian Antipasto Board
Serve your Pioneer Woman cheese straws as the centerpiece of an Italian-inspired antipasto spread. Arrange them vertically in a tall glass surrounded by prosciutto, salami, marinated artichokes, roasted red peppers, and fresh mozzarella balls. They’re perfect for dipping into warm marinara sauce.
4. Flavorful Southern Pairing
Enhance your Pioneer Woman Cheese Straws Recipe by serving alongside pioneer woman au gratin potatoes, adding creamy richness and a comforting texture contrast that creates a well-balanced, crowd-pleasing Southern-inspired appetizer spread.
5. Wine and Cheese Reception
These elegant straws are sophisticated enough for upscale entertaining. Pair them with a crisp Sauvignon Blanc, sparkling Prosecco, or a light Pinot Noir. Serve alongside gourmet cheese selections, fig jam, and candied nuts for a refined wine tasting experience.
6. Soup Companion
Use cheese straws as the ultimate soup accompaniment-they’re far more interesting than plain crackers or bread. They pair exceptionally well with tomato bisque, French onion soup, butternut squash soup, or creamy potato leek soup. The crispy texture contrasts beautifully with smooth, velvety soups.
7. Cozy Comfort Combo
Upgrade your Pioneer Woman Cheese Straws Recipe experience by pairing it with pioneer woman split pea soup, delivering a warm, hearty contrast that blends crispy, cheesy bites with smooth, savory goodness.
8. Salad Topper Twist
Break cooled cheese straws into smaller pieces and use them as gourmet croutons over Caesar salad, mixed greens, or roasted beet salad. The cheesy, buttery crunch adds restaurant-quality flair to simple salads.
9. Holiday Charcuterie Enhancement
During festive seasons, incorporate different colored cheeses or add festive spices like everything bagel seasoning. Arrange them on holiday charcuterie boards with seasonal fruits, nuts, honey, and specialty crackers. They make impressive edible gifts when wrapped in cellophane bags with festive ribbons.
Essential Tips for Perfect Cheese Straws
1. Temperature Control is Critical
The secret to how to make cheese twists that hold their shape lies in temperature management. Keep your puff pastry as cold as possible while still being pliable enough to work with. If it becomes too warm and sticky during preparation, pop it in the refrigerator for 5-10 minutes. Cold pastry twists better and maintains distinct layers during baking, resulting in that coveted flaky texture.
2. Use a Microplane for Ultra-Fine Cheese
Invest in a quality microplane grater for your cheese. Finely grated cheese adheres much better to the pastry than pre-shredded varieties, which often contain anti-caking agents that prevent proper melting. The fine shreds also distribute more evenly and create a more cohesive cheese coating that won’t fall off during twisting or baking.
3. Don’t Skip the Pressing Step
That plastic wrap pressing technique isn’t just a suggestion-it’s crucial for success. Firmly pressing the cheese into the oiled pastry creates adhesion that survives the twisting and baking process. Without this step, you’ll lose precious cheese during handling, and your straws won’t have that intensely cheesy flavor in every bite.
4. Anchovy Oil is a Game-Changer
If you’re wondering what makes the best cheese straws recipe ever stand out, it’s often that secret umami boost. Using olive oil from a can or jar of anchovies (without the actual anchovies if you’re not a fan) adds incredible savory depth without any fishy taste. It’s the kind of “what IS that amazing flavor?” ingredient that elevates these from good to extraordinary.
5. Customize Your Twist Tightness
Experiment with how tightly you twist the straws to find your perfect texture preference. Tighter twists create denser, crispier straws with more compact layers-ideal if you love maximum crunch. Looser twists yield softer, more bread-like interiors with crispy exteriors-better for those who prefer a substantial, less delicate bite.
6. The Flip is Non-Negotiable
Flipping the straws halfway through baking ensures even color and crispness on all surfaces. Without flipping, the bottom may remain pale and less crispy while the top over-browns. Use tongs and work quickly to minimize heat loss from your oven. This extra step takes just two minutes but makes a dramatic difference in texture.
7. Test for True Doneness
Visual cues can be deceiving with puff pastry. The ultimate doneness test is the “hold test”-pick up a straw by one end and hold it horizontally. If it droops or bends at all, it needs more time. Perfectly baked cheese straws will be completely rigid and stiff when held, indicating that all moisture has been driven out and the pastry is thoroughly crisp throughout.
Storage and Reheating Guidance
Store completely cooled cheese straws in an airtight container at room temperature for up to 3 days. For longer storage, freeze in a single layer on a baking sheet, then transfer to freezer bags for up to 2 months. Reheat in a 350°F oven for 5-7 minutes to restore crispness-avoid microwaving, which makes them soggy.
Pioneer Woman Cheese Straws Recipe

If you’ve been searching for the ultimate copycat Pioneer Woman cheese straws recipe, you’ve landed in exactly the right place! These golden, flaky cheese twists are the perfect balance of buttery puff pastry, sharp aged cheddar, and nutty Parmesan. Whether you’re hosting a dinner party, need an impressive appetizer, or simply want a savory snack that disappears in minutes, learning how to make Pioneer Woman cheese straws will become your new favorite kitchen skill.
Ingredients
- 1 sheet frozen puff pastry
- 2 teaspoons olive oil
- Salt (to taste)
- Freshly ground black pepper
- Cayenne pepper
- ½ cup finely grated aged white cheddar cheese
- ½ cup finely grated Parmigiano-Reggiano
- Dried herbs
- Smoked paprika
- Curry powder
- Garlic powder
Instructions
Step 1: Prepare the Puff Pastry
Place one sheet of frozen puff pastry on a lightly floured cutting board. Allow it to thaw just enough so you can unfold it without cracking-keep it as cold as possible for easier handling. Unfold the pastry completely (don’t worry about the seams; they won’t affect your final result).
Step 2: Season and Add Cheese
Drizzle or brush the entire surface evenly with olive oil, using anchovy-packed olive oil if available for extra savory depth. Season generously with salt, freshly ground black pepper, and cayenne pepper to your preferred heat level. Using a microplane, finely grate the aged white cheddar over the entire surface, covering it completely. The cheese should look abundant-fine shreds create better adhesion. Follow with a generous layer of finely grated Parmesan.
Step 3: Press the Cheese
Cover the topped pastry with plastic wrap. Using your palms or the bottom of a flat pan, press down firmly across the entire surface. This crucial step helps the cheese adhere properly to the pastry and prevents it from falling off during twisting.
Step 4: Cut the Strips
Remove the plastic wrap. Using a pizza cutter (preferred for clean cuts) or a sharp knife, first cut along the existing fold lines to divide the pastry into three sections. Then cut each third into three equal strips, creating 9 total strips. For crispier straws, cut thinner; for softer, more bread-like texture, cut thicker.
Step 5: Twist the Straws
Flip each strip over so the seasoned, cheesy side faces down. Hold both ends of a strip and twist from the center outward, creating a spiral shape. Twist tighter for denser, crispier results, or looser for a softer texture. Try to keep the cheesy side facing outward as you twist for maximum visual appeal.
Step 6: Add Final Cheese Coating
Arrange the twisted straws on a parchment-lined baking sheet, spacing them about an inch apart. Finely grate additional Parmesan over the tops of all straws. Gently roll each straw on the sheet to pick up any fallen cheese-the soft, sticky dough will grab it beautifully.
Step 7: Bake to Golden Perfection
Bake in a preheated 400°F (200°C) oven for 20-30 minutes total. After 10-15 minutes, carefully flip each straw over using tongs to ensure even browning and crisping on both sides. Continue baking until the straws are deeply golden brown and completely stiff. Test doneness by holding one up by the end-it should not droop at all.
Step 8: Cool and Serve
Transfer the baked cheese straws immediately to a wire cooling rack. This prevents condensation from forming on the bottom, which would make them soggy. Let cool for at least 5 minutes before serving (though they’re also delicious warm).
Notes
Store completely cooled cheese straws in an airtight container at room temperature for up to 3 days. For longer storage, freeze in a single layer on a baking sheet, then transfer to freezer bags for up to 2 months. Reheat in a 350°F oven for 5-7 minutes to restore crispness-avoid microwaving, which makes them soggy.
Nutrition Information:
Yield:
8Serving Size:
1Amount Per Serving: Calories: 20
Common Queries and FAQs
Here, we’ve got you covered with some common questions about the Pioneer Woman Cheese Straws Recipe that people often ask.
Can I use store-bought shredded cheese instead of grating my own?
While you can use pre-shredded cheese in a pinch, freshly grated cheese works significantly better. Store-bought shredded varieties contain cellulose or potato starch as anti-caking agents, which prevent proper melting and adhesion to the puff pastry. Freshly grated cheese melts smoothly, creates better flavor, and sticks to the pastry more effectively during the twisting process.
Why do my cheese straws lose their shape during baking?
Shape loss typically happens when the puff pastry is too warm when it goes into the oven. Make sure your pastry stays cold throughout preparation-if it feels soft or sticky, refrigerate it for 10 minutes before twisting. Also, ensure you’re twisting firmly enough; loose twists can unwind during baking. Finally, don’t skip flipping the strips cheese-side-down before twisting, as this helps lock in the spiral shape.
Can I make the cheese straws ahead of time?
Absolutely! You can prepare the twisted, unbaked straws and freeze them on a parchment-lined baking sheet. Once frozen solid (about 2 hours), transfer them to a freezer bag or container. They’ll keep for up to 3 months. Bake directly from frozen, adding 5-10 minutes to the baking time. No thawing necessary! This makes them perfect for entertaining-just pull out what you need and bake fresh.
What’s the best type of puff pastry to use?
All-butter puff pastry (like Dufour brand) produces the richest, most flavorful results with superior flakiness. However, standard frozen puff pastry from brands like Pepperidge Farm works perfectly well and is more budget-friendly. Avoid puff pastry sheets that come in tubes, as they’re typically lower quality. Look for pastry that comes flat-folded in the freezer section for best results.
How do I prevent the cheese from burning?
If your cheese browns too quickly while the pastry remains undercooked, reduce your oven temperature to 375°F and extend the baking time slightly. Also, make sure you’re using finely grated cheese rather than thick shreds-fine cheese distributes evenly and is less likely to burn. If the tops are browning too fast, tent them loosely with aluminum foil for the last 5-10 minutes of baking.
Can I make these gluten-free?
Yes, by using gluten-free puff pastry, which is available from brands like Schar or Geefree. Follow the same recipe and technique, though gluten-free pastry can be slightly more delicate to handle. Keep it extra cold and work quickly. The results won’t be quite as flaky as traditional puff pastry, but they’ll still be delicious and crispy with great cheese flavor.
What’s the difference between cheese straws and cheese twists?
The terms are often used interchangeably, and this recipe creates what’s commonly called either cheese straws or cheese twists. Technically, “straws” can refer to any thin, crispy cheese-based snack (sometimes made with different doughs), while “twists” specifically describes the spiral shape. This recipe creates twisted cheese straws-the best of both worlds!
Do I really need to use anchovy oil?
No, it’s completely optional! Regular olive oil works perfectly fine and produces delicious results. The anchovy oil is a chef’s trick that adds a subtle umami depth and savory complexity without any fishiness. Most people won’t be able to identify it as anchovy-they’ll just taste incredible savory richness. If you’re adventurous, try it; if not, stick with regular olive oil.
This copycat Pioneer Woman cheese straws recipe proves that impressive, gourmet appetizers don’t require complicated techniques or expensive ingredients. With just a handful of pantry staples and one sheet of puff pastry, you can create elegant, restaurant-worthy cheese twists that’ll have everyone asking for your secret.
The combination of buttery, flaky layers with sharp aged cheeses creates an irresistible snack that’s perfect for any occasion-from casual family gatherings to sophisticated cocktail parties. Now that you know how to make Pioneer Woman cheese straws, you’ll find yourself turning to this recipe again and again!
You can also follow us on Pinterest, and YouTube for more delicious updates and kitchen inspiration. Your feedback and support mean the world to us!