
There’s something magical about a homemade pie crust that crumbles at the touch of your fork, releasing buttery layers that melt on your tongue.
This copycat Pioneer Woman pie dough recipe captures everything Ree Drummond does best-simple ingredients transformed into bakery-worthy results. Whether you’re crafting a towering apple pie for Thanksgiving or a silky cream pie for Sunday dinner, this pioneer woman pie dough recipe with butter delivers that tender-crisp texture we all crave.
The secret? Cold butter, minimal handling, and a technique that creates flaky layers without fuss. Let’s dive into how to make Pioneer Woman pie dough that’ll have everyone asking for seconds.
What Does It Taste Like?
This Ree Drummond pie crust tastes like pure, unadulterated butter with a delicate hint of sweetness and salt. Each bite delivers a satisfying crunch that gives way to tender, flaky layers that practically dissolve on your palate.

The crust itself is rich without being heavy, with a subtle wheaty flavor from the all-purpose flour that provides the perfect neutral canvas for both sweet and savory fillings.
Unlike store-bought versions, this pioneer woman perfect pie crust has a complex, almost nutty richness from the real butter, with edges that caramelize to a beautiful golden-brown, adding a toasty depth that complements everything from tart cherries to silky chocolate.
Pioneer Woman Pie Dough Ingredients You’ll Need
For the Pie Dough:
- 3 cups all-purpose flour (360 g), divided
- 1 tablespoon granulated sugar (or 2-3 tablespoons for sweeter pies)
- 1 teaspoon salt
- 1 cup (2 sticks / 227 g) unsalted butter, very cold and cubed
- 4–9 tablespoons ice water (start with 4, add as needed)
Optional Variations:
- Vegetable shortening (for extra tenderness)
- Cream cheese (for tangy richness)
- Lemon zest or fresh herbs (for savory pies)
- Cinnamon or pumpkin pie spice (for sweet pies)
For Blind Baking:
- 1 egg + 1 tablespoon water (egg wash)
- Pie weights or dried beans
- Parchment paper or aluminum foil
Essential Kitchen Utensils
- Food processor (or large mixing bowl for hand method)
- Rolling pin
- 9-inch metal pie pan
- Plastic wrap or beeswax wrap
- Pastry mat or clean counter
- Fork (for docking)
- Heavy-duty aluminum foil or parchment paper
- Pastry brush (for egg wash)
- Measuring cups and spoons
Preparation and Cooking Time
- Prep Time: 20 minutes
- Chilling Time: 1 hour minimum (up to 2 days)
- Freezing Time: 30 minutes (for shaped crust)
- Blind Baking Time: 30 minutes total
- Total Time: Approximately 2 hours 20 minutes
- Yield: 2 pie crusts (serves 12-16 slices)
Pioneer Woman Pie Dough Recipe Instructions
Step 1: Combine the Dry Ingredients
Add 1½ cups (180 g) all-purpose flour, 1 tablespoon sugar, and 1 teaspoon salt to your food processor. Pulse 3-4 times to distribute evenly. If making by hand, whisk these ingredients together in a large bowl until well combined.
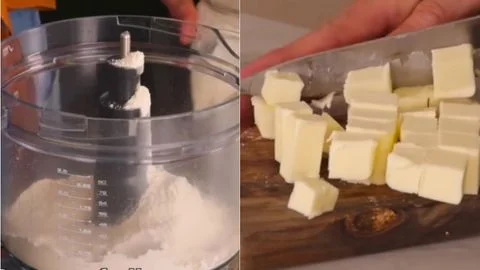
Step 2: Cut in the First Butter Addition
Cube your very cold butter into small pieces. Add half the butter (about ½ cup or 1 stick) to the flour mixture. Pulse 8-10 times until the mixture resembles coarse crumbs with small pea-sized butter pieces visible. This takes about 30 seconds-don’t over-process. For the hand method, use a pastry cutter or your fingertips to rub the butter into the flour until you achieve pea- to almond-sized pieces.
Step 3: Add Remaining Flour and Butter
Add the remaining 1½ cups (180 g) flour and the rest of the cubed cold butter to the processor. Pulse just 2-3 times to start incorporating-you want larger butter pieces remaining for maximum flakiness. The mixture should look shaggy and uneven, which is exactly what you want for that layered texture in your pioneer woman perfect pie crust.
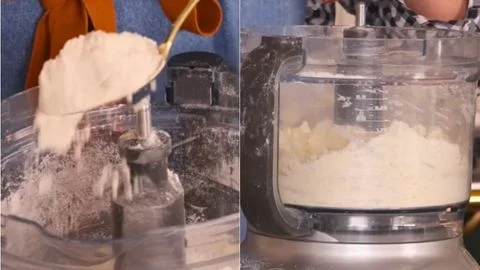
Step 4: Add Ice Water Gradually
Drizzle 4 tablespoons (¼ cup) of ice water over the flour-butter mixture. Pulse 3-4 times, then test the dough by pressing a small handful together. If it holds its shape, you’re done. If it crumbles apart, add 1 more tablespoon of ice water, pulse, and test again. Repeat until the dough is shaggy but cohesive when pressed-this may take anywhere from 4-9 tablespoons total depending on your climate and flour.
Step 5: Create Flaky Layers
Dump the shaggy dough onto a clean counter. Using the heel of your hand, press and flatten the dough 2-4 times, pushing it away from you. This technique, called fraisage, creates those beautiful flaky layers without activating too much gluten. Avoid kneading-just a few firm presses will do.
Step 6: Shape and Chill
Gather the dough into a ball, then divide it into two equal portions. Shape each portion into a flat disc about 1-inch thick. Wrap each disc tightly in plastic wrap and refrigerate for at least 1 hour. This resting time allows the gluten to relax and the butter to firm up, preventing shrinkage during baking.
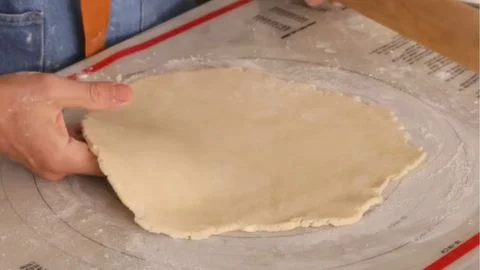
Step 7: Roll Out the Dough
On a lightly floured surface, roll one chilled disc from the center outward, rotating the dough a quarter-turn after each roll. Aim for a 14-inch circle about ⅛-inch thick. If the dough cracks, pinch it together or let it rest at room temperature for 5-10 minutes to soften slightly.
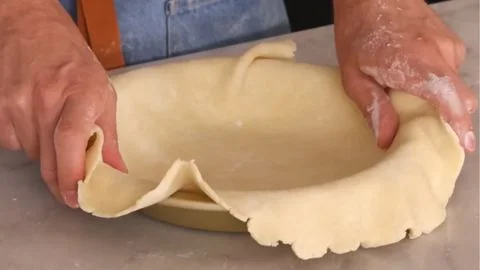
Step 8: Transfer to Pie Pan
Fold the rolled dough into quarters or gently roll it onto your rolling pin, then lift and center it over a 9-inch metal pie pan. Unfold or unroll carefully, letting the dough settle into the pan without stretching. Stretching causes shrinkage during baking.
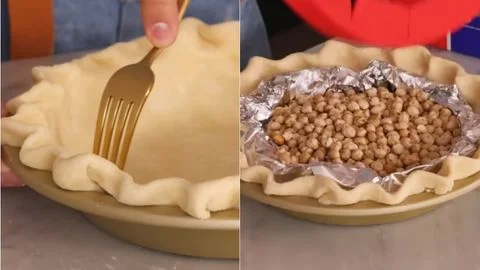
Step 9: Trim and Crimp
Trim excess dough, leaving about 1 inch of overhang. Fold this overhang under itself to create a reinforced edge, then crimp decoratively using your thumb and forefinger or press with a fork. Dock (poke holes in) the bottom and sides with a fork to prevent puffing.
Step 10: Freeze Before Baking
Place the shaped crust in the freezer for 30 minutes. This crucial step firms up the butter, which prevents shrinking and creates steam pockets that result in flaky layers.
Step 11: Prepare for Blind Baking
Preheat your oven to 425°F (220°C). Line the frozen crust with heavy-duty foil (use three layers of regular foil) or parchment paper, pressing it gently into all corners and up the sides. Fill with pie weights or dried beans to hold the crust down during baking.
Step 12: Par-Bake
Bake at 425°F for 20 minutes with the weights in place. The edges should just start taking on color. Remove the foil and weights carefully-the crust will be hot.
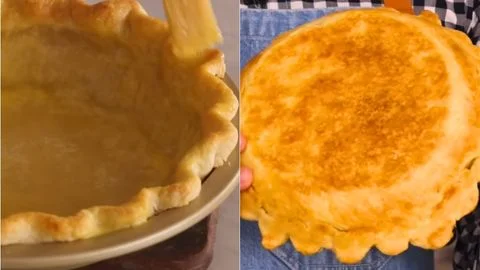
Step 13: Complete the Blind Bake
Optional but recommended: Brush the crust with egg wash (1 egg beaten with 1 tablespoon water) for a golden sheen and moisture barrier. Redock any puffed areas. Return to the oven for another 10 minutes or until the crust is golden brown and completely dry throughout. If the edges brown too quickly, tent them with foil strips. Let cool completely before filling.
Customization and Pairing for Serving Ideas
1. Classic Double-Crust Fruit Pies
Use this copycat Pioneer Woman pie dough recipe for traditional apple, cherry, or blueberry pies. The all-butter formula creates incredible flakiness that stands up beautifully to juicy fruit fillings. Par-bake the bottom crust for 10 minutes before adding filling to prevent sogginess, then top with the second crust, crimp, and bake according to your pie recipe.
2. Cream and Custard Pie Base
Fully blind-bake this crust until deeply golden for cream pies, chocolate silk pies, or lemon meringue. The egg wash creates an impermeable barrier that keeps pudding fillings from making the crust soggy. This method works perfectly for banana cream, coconut cream, or key lime variations.
3. Savory Quiche Foundation
Transform this into a savory masterpiece by reducing sugar to 1 teaspoon and adding 1 tablespoon fresh thyme, rosemary, or a teaspoon of dried herbs to the flour mixture. Add a teaspoon of lemon zest for brightness. This version pairs beautifully with quiches, pot pies, and savory galettes filled with caramelized onions, gruyère, and bacon.
4. Berry Dessert Harmony
Serve this crust from the Pioneer Woman Pie Dough Recipe with fresh berries and whipped cream, pairing alongside pioneer woman texas sheet cake for celebrations, creating a cohesive dessert spread.
5. Brunch Board Twist
Transform leftovers from your Pioneer Woman Pie Dough Recipe into hand pies or crisps, and offer a brunch board featuring pioneer woman waffle bites, maple syrup, and fresh seasonal fruit.
6. Sweet Savory Balance
Add savory-sweet contrast by serving the Pioneer Woman Pie Dough Recipe as mini quiches with herbs and cheese, then finish with pioneer woman peanut butter fudge squares for indulgent balance.
7. Sweet Spiced Variation
Increase sugar to 3 tablespoons and add 1 teaspoon cinnamon or ½ teaspoon pumpkin pie spice to the flour for pumpkin, sweet potato, or pecan pies. The warm spices complement autumn flavors and add aromatic complexity that makes your kitchen smell like a bakery.
8. Half-Butter, Half-Shortening Tender Crust
Replace half the butter (½ cup) with vegetable shortening for an ultra-tender crust that’s easier to work with. Shortening has a higher melting point, so it creates a more forgiving dough that’s perfect for beginners learning how to make Pioneer Woman pie dough. This version still delivers excellent flavor while being slightly less temperamental.
9. Cream Cheese Enrichment
Substitute 4 tablespoons (2 ounces) of the butter with cream cheese for a tangy, incredibly tender crust. This variation works exceptionally well for berry pies, where the slight tang complements the fruit’s natural acidity. The cream cheese also makes the dough more pliable and easier to roll.
10. Hand Pies and Mini Tarts
Roll scraps or use full discs to create individual hand pies, pop-tarts, or mini tart shells. Cut circles with a cookie cutter, fill with jam, fruit, or savory mixtures, seal the edges with a fork, and bake at 375°F until golden. These portable treats are perfect for lunchboxes, picnics, or afternoon tea.

Essential Tips for Perfect Pie Crust
1. Keep Everything Cold-Seriously Cold
The cardinal rule of this Ree Drummond pie crust is temperature control. Freeze your butter for 15 minutes before cubing, use actual ice water (with ice cubes floating in it), and even chill your flour if your kitchen is warm. Cold butter creates steam pockets during baking that result in flaky layers. If your dough becomes warm and sticky while rolling, pop it back in the refrigerator for 10-15 minutes. Some bakers even freeze their food processor bowl and blade beforehand for ultimate temperature control.
2. Don’t Overwork the Dough
Gluten development is the enemy of tender pie crust. Each time you mix, knead, or handle the dough, you’re activating gluten proteins that create toughness. This is why the recipe calls for minimal pulsing in the food processor and just 2-4 presses by hand. You want visible butter pieces-those create flakiness. A shaggy, barely-cohesive dough is perfect; a smooth, homogeneous dough will be tough.
3. Adjust Water Based on Humidity
Flour absorbs moisture from the air, so you’ll need less water on humid days and more on dry days. Start with just 4 tablespoons and add one tablespoon at a time. The dough should look shaggy and feel slightly dry in the bowl but hold together when pressed firmly. If you can form a ball easily, you’ve added too much water. This variable nature is why how to make Pioneer Woman pie dough requires attention rather than autopilot.
4. Use Metal Pie Pans for Crispier Crusts
Glass and ceramic pans insulate the crust, leading to soggy bottoms. Metal pans, especially aluminum, conduct heat more efficiently, resulting in a crisp, golden bottom crust. Dark metal pans promote even more browning, so reduce your oven temperature by 25°F if using them. For the absolute best results, use a perforated pizza pan under your pie plate to allow air circulation underneath.
5. Freeze Shaped Crusts Before Baking
That 30-minute freeze after shaping isn’t optional-it’s essential. Frozen butter melts slowly in the oven, creating those steam channels that make the crust flaky. Freezing also prevents shrinkage by allowing the gluten to fully relax. If you’re short on time, 15 minutes in the freezer is better than nothing, but 30 minutes or even overnight produces superior results.
6. Dock Thoroughly and Use Adequate Weights
Those fork holes (docking) allow steam to escape, preventing air bubbles. Poke all over the bottom and sides, getting close to the edges. When blind baking, fill the entire crust generously with weights-don’t just sprinkle a few in the center. The weights should come up the sides to prevent slumping. Dried beans work perfectly and can be reused indefinitely for pie weights (just don’t eat them afterward).
7. Master the Egg Wash Technique
After par-baking, brush the entire crust with egg wash before the final bake. This creates a waterproof seal that prevents soggy bottoms with wet fillings. It also adds beautiful color and a subtle shine. For extra insurance with very wet fillings like custards, you can brush the crust with egg wash and return it to the oven for just 2-3 minutes to set the coating before adding filling.
Storage and Reheating Guidance
Wrapped dough discs keep refrigerated for up to 2 days or frozen for 3 months. Thaw frozen dough overnight in the refrigerator before rolling. Baked crusts stay fresh at room temperature for 2 days or frozen for 1 month.
Pioneer Woman Pie Dough Recipe
There’s something magical about a homemade pie crust that crumbles at the touch of your fork, releasing buttery layers that melt on your tongue. This copycat Pioneer Woman pie dough recipe captures everything Ree Drummond does best-simple ingredients transformed into bakery-worthy results.
Ingredients
- 3 cups all-purpose flour (360 g), divided
- 1 tablespoon granulated sugar (or 2-3 tablespoons for sweeter pies)
- 1 teaspoon salt
- 1 cup (2 sticks / 227 g) unsalted butter, very cold and cubed
- 4–9 tablespoons ice water (start with 4, add as needed)
- Vegetable shortening (for extra tenderness)
- Cream cheese (for tangy richness)
- Lemon zest or fresh herbs (for savory pies)
- Cinnamon or pumpkin pie spice (for sweet pies)
- 1 egg + 1 tablespoon water (egg wash)
- Pie weights or dried beans
- Parchment paper or aluminum foil
Instructions
Step 1: Combine the Dry Ingredients
Add 1½ cups (180 g) all-purpose flour, 1 tablespoon sugar, and 1 teaspoon salt to your food processor. Pulse 3-4 times to distribute evenly. If making by hand, whisk these ingredients together in a large bowl until well combined.
Step 2: Cut in the First Butter Addition
Cube your very cold butter into small pieces. Add half the butter (about ½ cup or 1 stick) to the flour mixture. Pulse 8-10 times until the mixture resembles coarse crumbs with small pea-sized butter pieces visible. This takes about 30 seconds-don’t over-process. For the hand method, use a pastry cutter or your fingertips to rub the butter into the flour until you achieve pea- to almond-sized pieces.
Step 3: Add Remaining Flour and Butter
Add the remaining 1½ cups (180 g) flour and the rest of the cubed cold butter to the processor. Pulse just 2-3 times to start incorporating-you want larger butter pieces remaining for maximum flakiness. The mixture should look shaggy and uneven, which is exactly what you want for that layered texture in your pioneer woman perfect pie crust.
Step 4: Add Ice Water Gradually
Drizzle 4 tablespoons (¼ cup) of ice water over the flour-butter mixture. Pulse 3-4 times, then test the dough by pressing a small handful together. If it holds its shape, you’re done. If it crumbles apart, add 1 more tablespoon of ice water, pulse, and test again. Repeat until the dough is shaggy but cohesive when pressed-this may take anywhere from 4-9 tablespoons total depending on your climate and flour.
Step 5: Create Flaky Layers
Dump the shaggy dough onto a clean counter. Using the heel of your hand, press and flatten the dough 2-4 times, pushing it away from you. This technique, called fraisage, creates those beautiful flaky layers without activating too much gluten. Avoid kneading-just a few firm presses will do.
Step 6: Shape and Chill
Gather the dough into a ball, then divide it into two equal portions. Shape each portion into a flat disc about 1-inch thick. Wrap each disc tightly in plastic wrap and refrigerate for at least 1 hour. This resting time allows the gluten to relax and the butter to firm up, preventing shrinkage during baking
Step 7: Roll Out the Dough
On a lightly floured surface, roll one chilled disc from the center outward, rotating the dough a quarter-turn after each roll. Aim for a 14-inch circle about ⅛-inch thick. If the dough cracks, pinch it together or let it rest at room temperature for 5-10 minutes to soften slightly.
Step 8: Transfer to Pie Pan
Fold the rolled dough into quarters or gently roll it onto your rolling pin, then lift and center it over a 9-inch metal pie pan. Unfold or unroll carefully, letting the dough settle into the pan without stretching. Stretching causes shrinkage during baking.
Step 9: Trim and Crimp
Trim excess dough, leaving about 1 inch of overhang. Fold this overhang under itself to create a reinforced edge, then crimp decoratively using your thumb and forefinger or press with a fork. Dock (poke holes in) the bottom and sides with a fork to prevent puffing.
Step 10: Freeze Before Baking
Place the shaped crust in the freezer for 30 minutes. This crucial step firms up the butter, which prevents shrinking and creates steam pockets that result in flaky layers.
Step 11: Prepare for Blind Baking
Preheat your oven to 425°F (220°C). Line the frozen crust with heavy-duty foil (use three layers of regular foil) or parchment paper, pressing it gently into all corners and up the sides. Fill with pie weights or dried beans to hold the crust down during baking.
Step 12: Par-Bake
Bake at 425°F for 20 minutes with the weights in place. The edges should just start taking on color. Remove the foil and weights carefully-the crust will be hot.
Step 13: Complete the Blind Bake
Optional but recommended: Brush the crust with egg wash (1 egg beaten with 1 tablespoon water) for a golden sheen and moisture barrier. Redock any puffed areas. Return to the oven for another 10 minutes or until the crust is golden brown and completely dry throughout. If the edges brown too quickly, tent them with foil strips. Let cool completely before filling.
Notes
Wrapped dough discs keep refrigerated for up to 2 days or frozen for 3 months. Thaw frozen dough overnight in the refrigerator before rolling. Baked crusts stay fresh at room temperature for 2 days or frozen for 1 month.
Nutrition Information:
Yield:
6Serving Size:
1Amount Per Serving: Calories: 180
Common Queries and FAQs
Here, we’ve got you covered with some common questions about the Pioneer Woman Pie Dough Recipe that people often ask.
Why is my pie crust tough instead of flaky?
Tough crust results from overworking the dough or adding too much water. When you overmix, you develop gluten, which creates toughness. The solution is to handle the dough minimally-just enough to bring it together. Also, make sure you’re leaving visible butter pieces in the dough; these create the flaky layers. If you’ve kneaded or rolled the dough multiple times, you’ve activated too much gluten.
Can I make this pie dough without a food processor?
Absolutely! Use a pastry cutter, two knives, or even your fingertips to cut the cold butter into the flour. Work quickly to keep everything cold, and aim for pea-sized butter pieces. The hand method actually gives you more control and can result in a flakier crust because you’re less likely to over-process. Just rub the butter between your fingertips, letting it fall back into the bowl, until you achieve the right texture.
How do I prevent my pie crust from shrinking?
Shrinkage happens when gluten contracts or when warm butter melts too quickly. Prevent this by: (1) not stretching the dough when fitting it into the pan, (2) chilling or freezing the shaped crust before baking, (3) letting the dough rest in the refrigerator after rolling, and (4) keeping all ingredients cold. That 30-minute freeze before baking is your best insurance against shrinkage.
What’s the difference between par-baking and blind baking?
Par-baking (or partial blind baking) means partially cooking the crust before adding filling-typically for pies that will bake further with filling, like pumpkin or pecan pies. Blind baking means fully baking the crust until golden and crisp, used for no-bake fillings like cream pies or chocolate silk. For par-baking, remove weights after 20 minutes and bake just 5 more minutes. For full blind baking, continue for 10 minutes or until deeply golden.
Why does my bottom crust get soggy?
Soggy bottoms occur when moisture from the filling seeps into the unbaked crust. Prevent this by: (1) par-baking or blind baking first, (2) brushing with egg wash to create a barrier, (3) using a metal pie pan for better heat conduction, (4) baking on the lowest oven rack where heat is most intense, and (5) avoiding overly wet fillings. Some bakers sprinkle a tablespoon of breadcrumbs or ground cookies on the bottom before filling as an extra moisture barrier.
Can I substitute butter with shortening or lard?
Yes! All-shortening creates an extremely tender, foolproof crust but lacks butter’s rich flavor. Many bakers use a 50/50 combination-half butter for flavor, half shortening for tenderness and easier handling. Lard creates incredibly flaky, savory crusts perfect for pot pies and quiches. For this pioneer woman pie dough recipe with butter, the all-butter version delivers the best flavor, but don’t hesitate to experiment based on your preferences.
How thin should I roll the dough?
Aim for ⅛-inch thickness, which is about the thickness of two stacked quarters. Too thin and the crust will be crispy but fragile; too thick and it’ll be doughy and undercooked. Roll from the center outward, rotating the dough frequently to maintain even thickness. If you’re unsure, it’s better to err slightly thicker-you can always roll thinner, but you can’t add dough back.
What if my dough is too crumbly to roll?
If your dough falls apart when you try to roll it, you didn’t add enough water. Sprinkle a tablespoon of cold water over the dough, press it together, and try again. If it’s very crumbly, gather it back into a ball, make a small well in the center, add a tablespoon of ice water, and use your hands to incorporate it quickly. Re-chill for 15 minutes before rolling.
Can I freeze unbaked pie crusts?
Definitely! This is a fantastic make-ahead strategy. You can freeze discs of dough (wrap tightly in plastic, then foil) or shaped crusts already in the pie pan (wrap the whole pan). Frozen dough discs keep for 3 months and should thaw overnight in the refrigerator. Shaped crusts can go straight from freezer to oven-just add 5 extra minutes to the blind baking time.
Should I use salted or unsalted butter?
Unsalted butter is preferable because it lets you control the salt level precisely. Different brands of salted butter contain varying amounts of salt, which can throw off your recipe. If you only have salted butter, reduce or omit the added salt in the recipe. For this copycat Pioneer Woman pie dough recipe, unsalted butter gives you the most consistent, professional results.
Why do I need to chill the dough after mixing?
Chilling serves multiple purposes: it allows the gluten to relax (preventing shrinkage), firms up the butter (preventing spreading), hydrates the flour evenly, and makes the dough easier to roll without tearing. The minimum is 1 hour, but overnight chilling actually produces better results. The dough can chill for up to 2 days, and many professional bakers insist that day-old dough is superior.
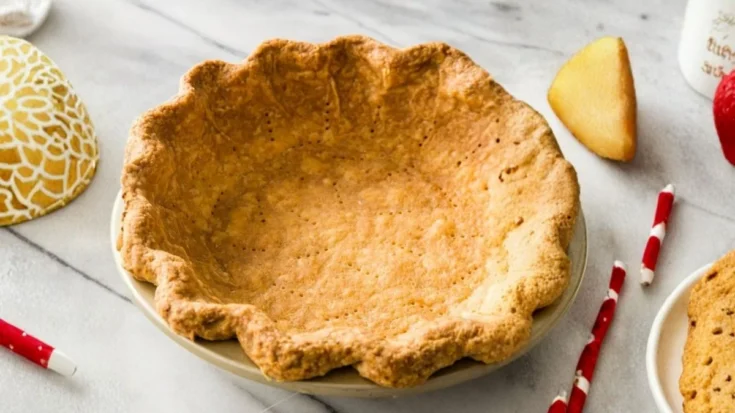
How do I know when my blind-baked crust is done?
A fully blind-baked crust should be deeply golden brown all over-not pale or blond. The bottom should feel dry and firm when touched, with no raw-dough appearance or tackiness. If you’re unsure, err on the side of slightly overbaked rather than underbaked. An underbaked crust will become soggy with filling, while a well-baked crust provides the perfect crispy foundation.
Can I add sugar or spices to make a sweeter crust?
Absolutely! The base recipe uses just 1 tablespoon of sugar for a versatile, slightly sweet crust. For dessert pies, increase to 2-3 tablespoons. Add ½ teaspoon cinnamon for apple pies, or ¼ teaspoon nutmeg for custard pies. For chocolate pies, add 2 tablespoons cocoa powder (reduce flour by 2 tablespoons to compensate). These variations make your Ree Drummond pie crust perfectly tailored to your filling.
What’s the best way to crimp pie edges?
For a classic look, use your thumb and forefinger to create a scalloped edge-press your thumb from the inside while pinching with two fingers from the outside. For a rustic look, simply press with a fork all around the edge. For an elegant finish, create a rope pattern by pinching the dough at an angle all around. Whatever style you choose, make sure the edge is well-sealed and slightly thick to prevent it from burning before the rest of the crust is done.
This copycat Pioneer Woman pie dough recipe proves that bakery-quality results don’t require professional training-just quality ingredients, cold butter, and a gentle touch. Whether you’re creating your first pie or your fiftieth, Ree Drummond’s foolproof technique delivers that tender, flaky perfection we all crave.
The beauty of mastering how to make Pioneer Woman pie dough is the endless possibilities it unlocks-from classic fruit pies to elegant cream-filled creations. So grab your rolling pin, keep everything cold, and get ready to impress everyone at your next gathering with a pioneer woman perfect pie crust that tastes as amazing as it looks!
You can also follow us on Pinterest, and YouTube for more delicious updates and kitchen inspiration. Your feedback and support mean the world to us!