
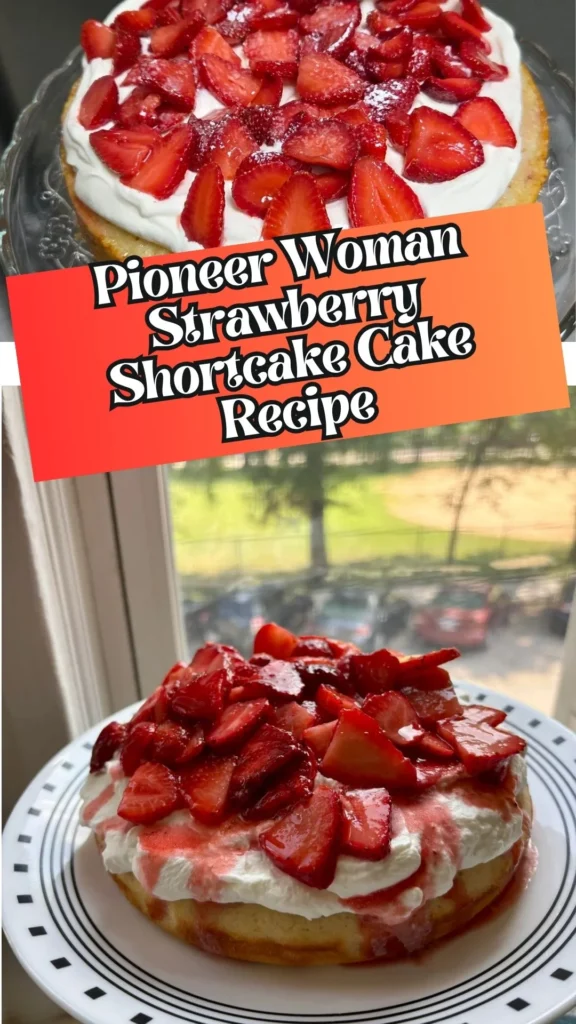
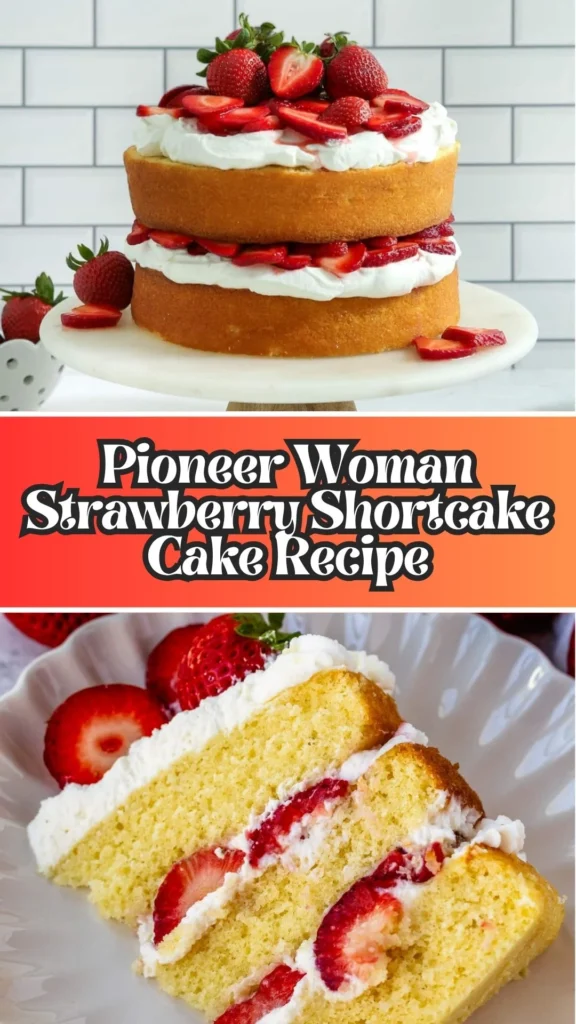
There’s something magical about combining fluffy vanilla cake layers with fresh, juicy strawberries and clouds of whipped cream frosting.
This copycat Pioneer Woman strawberry shortcake cake recipe transforms the beloved summer dessert into an elegant layered masterpiece that’s perfect for celebrations, potlucks, or whenever you’re craving something truly special.
Unlike traditional strawberry shortcake served in individual portions, this strawberry shortcake with cream cheese frosting alternative uses stabilized whipped cream for a lighter, more authentic flavor, perfect alongside pioneer woman french silk pie, blackberry cobbler, tres leche, lemon meringue tart, and chocolate pecan pie.
Whether you’re a seasoned baker or just learning how to make Pioneer Woman strawberry shortcake cake, this recipe delivers bakery-worthy results with straightforward techniques. The moist, tender crumb paired with sweet macerated berries creates an unforgettable dessert experience.
What Does Pioneer Woman Strawberry Shortcake Cake Taste Like?
This traditional strawberry shortcake cake recipe delivers a delightful balance of flavors and textures that’ll make your taste buds dance. The cake itself is buttery, moist, and tender with a delicate vanilla flavor that doesn’t overpower the star ingredient-fresh strawberries.
Each bite reveals pockets of sweet-tart macerated berries that have released their natural juices, creating a luscious filling between layers. The stabilized whipped cream frosting is light, airy, and subtly sweet, melting on your tongue without the heavy richness of buttercream.
Together, these elements create a dessert that tastes like summer in cake form-refreshing, not overly sweet, and absolutely addictive. It’s the perfect harmony of classic strawberry shortcake flavors elevated into an impressive layer cake.
Pioneer Woman Strawberry Shortcake Cake Ingredients You’ll Need
For the Vanilla Cake Layers:
- ½ cup (113g) unsalted butter, softened
- ½ cup (118ml) neutral cooking oil (canola, vegetable, or avocado oil)
- 1½ cups (300g) granulated sugar
- 4 large eggs, room temperature
- 1 tablespoon vanilla extract
- 3 cups (375g) all-purpose flour
- 1 tablespoon baking powder
- ½ teaspoon salt
- 1¼ cups (296ml) buttermilk, room temperature
And For The Macerated Strawberries:
- 2 pounds (907g) fresh strawberries
- 3 tablespoons granulated sugar
The Stabilized Whipped Cream Frosting:
- 1½ teaspoons unflavored gelatin
- 2 tablespoons cold water
- 2¼ cups (540ml) heavy cream (cold)
- ¾ cup (90g) powdered sugar
- 1½ teaspoons vanilla extract
Essential Kitchen Utensils
- Three 8-inch round cake pans
- Parchment paper
- Electric mixer (stand or hand mixer)
- Large mixing bowls
- Medium mixing bowls
- Whisk
- Rubber spatula
- Cooling racks
- Piping bag with round tip (optional, for decorating)
- Offset spatula
- Toothpicks
- Small microwave-safe bowl
- Cake leveler or serrated knife (optional)
Preparation and Cooking Time
Prep Time: 30 minutes
Baking Time: 24-26 minutes
Cooling Time: 45 minutes
Assembly Time: 20 minutes
Chilling Time: 30 minutes
Total Time: Approximately 2 hours 30 minutes
Servings: 12-14 slices
Step-by-Step Pioneer Woman Strawberry Shortcake Cake Recipe Instructions
Preparing the Cake Batter
Step 1
Preheat your oven to 350°F (175°C). Grease three 8-inch cake pans generously with butter or non-stick spray, dust with flour, and line the bottoms with parchment paper rounds for easy release.
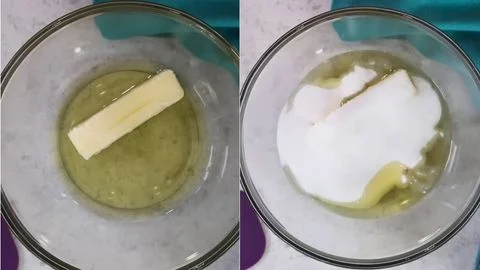
Step 2
In a large mixing bowl, combine the softened butter, neutral oil, and granulated sugar. Using an electric mixer on medium-high speed, cream together for 1–3 minutes until the mixture becomes light, fluffy, and pale in color.
Step 3
Add the room-temperature eggs one at a time, beating well after each addition to ensure proper incorporation. Add the vanilla extract with the last egg and mix until combined.
Step 4
In a separate medium bowl, whisk together the all-purpose flour, baking powder, and salt until evenly distributed.
Step 5
With the mixer turned off, add about one-third of the dry ingredients to the wet mixture, then gently fold with a rubber spatula. Add half of the buttermilk and fold again. Continue alternating, ending with the final third of dry ingredients.

Important: Do not use the electric mixer during this step-overmixing will create a tough, dense cake. Mix just until you can no longer see dry flour; a few small lumps are perfectly fine.
Baking the Layers
Step 6
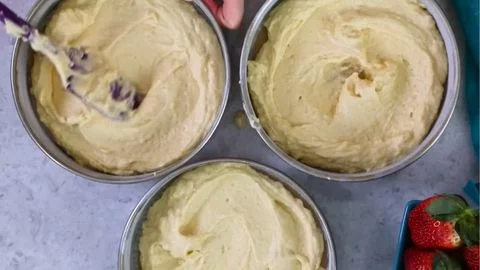
Evenly divide the batter among the three prepared pans using a kitchen scale for precision if desired. Smooth the tops with your spatula.
Step 7
Bake for 24–26 minutes, or until the cakes spring back when lightly touched and a toothpick inserted in the center comes out clean or with just a few moist crumbs.
Step 8
Cool the cakes in their pans for 10–15 minutes, then run a knife around the edges to loosen. Invert onto cooling racks, peel off the parchment paper, and allow to cool completely before assembling.
Preparing the Macerated Strawberries
Step 9
Set aside about ½ pound of the prettiest strawberries for decoration and cut them in half lengthwise.

Step 10
Hull and dice the remaining strawberries into small bite-sized pieces (about ¼ to ½ inch). Place them in a bowl, sprinkle with 3 tablespoons of granulated sugar, and stir to combine. Let them sit at room temperature while you prepare the frosting-they’ll release their natural juices and create a syrupy mixture.
Making the Stabilized Whipped Cream Frosting
Step 11
In a small bowl, sprinkle 1½ teaspoons of unflavored gelatin over 2 tablespoons of cold water. Stir until the gelatin is fully absorbed and the mixture looks like wet sand. Set aside to bloom.
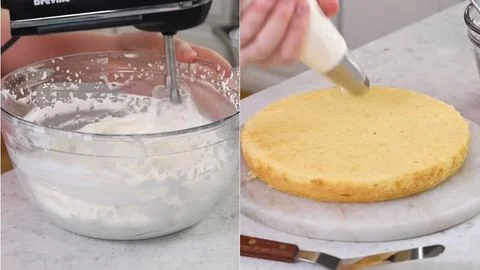
Step 12
In a large, clean mixing bowl, combine the cold heavy cream, powdered sugar, and vanilla extract. Start mixing on low speed until the sugar is incorporated, then increase to high speed. Beat until the mixture starts to thicken but hasn’t yet reached stiff peaks.
Step 13
Microwave the bloomed gelatin in 5-second intervals until it’s completely melted and liquid (usually 10-15 seconds total). Be careful not to overheat. Let it cool slightly for about 30 seconds-it should be warm but not hot.
Step 14
With the mixer running on low speed, slowly drizzle the melted gelatin into the partially whipped cream in a thin stream. Once fully incorporated, increase the speed to high and continue beating until stiff, fluffy peaks form. The frosting should resemble the texture of Cool Whip and hold its shape beautifully.
Assembling Your Strawberry Shortcake Cake
Step 15
If your cake layers have domed tops, use a cake leveler or serrated knife to trim them flat for easier stacking. Place the first cake layer on your serving plate or cake stand.
Step 16
Spread a thin, even layer of whipped cream frosting on top of the first layer. Using a piping bag fitted with a round tip (or a spoon), create a frosting “dam” or border around the outer edge of the cake-this prevents the strawberry filling from squeezing out.
Step 17
Using a slotted spoon, add half of the macerated strawberries inside the frosting dam, leaving most of the excess juice in the bowl. Spread them evenly and add a little extra frosting on top if needed to create a level surface.
Step 18
Place the second cake layer on top and repeat the process with frosting dam, remaining macerated strawberries, and a bit more frosting.
Step 19
Add the third and final cake layer on top. Apply a light “semi-naked” coating of frosting around the sides of the cake, allowing some of the cake layers to show through for that rustic, homemade look that’s so popular.
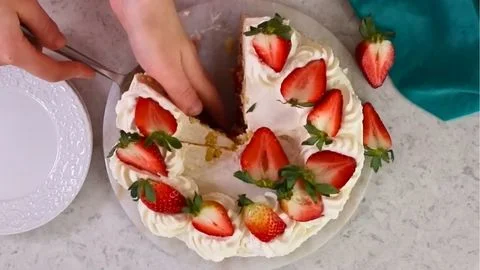
Step 20
Pipe decorative swirls or dollops of frosting on top of the cake and arrange the reserved halved strawberries on the frosting swirls for a beautiful finish.
Step 21
Refrigerate the assembled cake for at least 15–30 minutes before slicing to allow everything to set. The cake can be refrigerated for up to 2–3 days, though it’s best enjoyed within 24 hours for optimal texture and freshness.
Customization and Pairing Ideas for Your Strawberry Shortcake Cake
1. Berry Medley Variation
Transform this pioneer woman strawberry shortcake trifle recipe concept by mixing strawberries with fresh blueberries, raspberries, or blackberries. The combination of different berry flavors adds complexity and visual appeal with pops of purple and red throughout each slice.
2. Lemon-Infused Twist
Add 2 tablespoons of fresh lemon zest to your cake batter and 1 tablespoon to the whipped cream frosting for a bright, citrusy note that complements the strawberries beautifully. This variation is especially refreshing for summer gatherings and cuts through the sweetness perfectly.
3. Boozy Adult Version
Brush each cake layer with a mixture of 3 tablespoons amaretto, Grand Marnier, or strawberry liqueur mixed with 2 tablespoons of water before adding the frosting and berries. This sophisticated touch is perfect for adult celebrations and adds depth to the overall flavor profile.
4. Cream Cheese Frosting Alternative
While this recipe uses stabilized whipped cream, you can create a true strawberry shortcake with cream cheese frosting by beating 8 ounces of softened cream cheese with 1 cup of butter, 4 cups of powdered sugar, and vanilla extract. This creates a richer, tangier frosting that some prefer for special occasions.
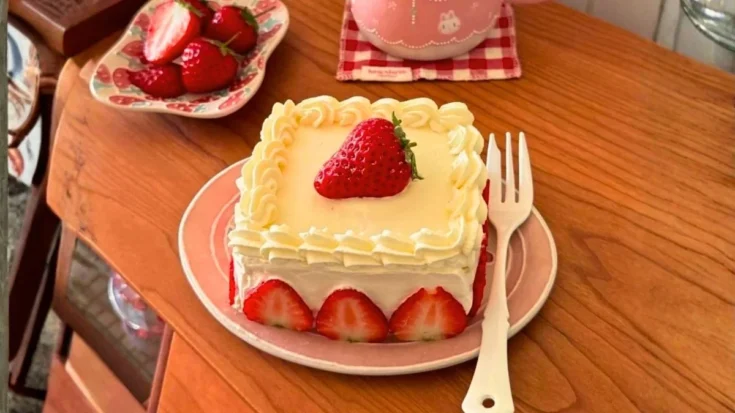
5. Individual Parfait Presentation
Crumble the baked cake layers and layer them in clear glasses with the macerated strawberries and whipped cream to create a pioneer woman strawberry shortcake trifle recipe experience. This presentation is perfect for parties where guests can serve themselves and shows off the beautiful layers.
6. Chocolate-Dipped Strawberry Garnish
Elevate your cake’s appearance by dipping the decorative strawberry halves in melted dark or white chocolate before arranging them on top. Let them set in the refrigerator before placing them on the cake for an elegant, professional bakery look.
7. Serving Suggestions
This cake pairs wonderfully with a scoop of vanilla bean ice cream, a drizzle of warm strawberry sauce, or fresh mint leaves for garnish. Serve alongside champagne or sparkling rosé for brunch, iced tea for afternoon gatherings, or coffee for a delightful dessert course. The cake also works beautifully as a centerpiece for Mother’s Day, Easter, birthday celebrations, or summer barbecues.
Expert Tips for Perfect Strawberry Shortcake Cake
1. Room Temperature Ingredients Are Crucial
This is the golden rule for tender, evenly-textured cakes. Room temperature eggs, butter, and buttermilk emulsify together much better than cold ingredients, creating a smoother batter that bakes more evenly. Take your eggs and buttermilk out of the refrigerator 1-2 hours before baking, or quick-temper eggs by placing them in warm water for 5-10 minutes.
2. Don’t Skip the Gelatin in Your Whipped Cream
The unflavored gelatin is what makes this traditional strawberry shortcake cake recipe assembly-friendly and stable. Without it, regular whipped cream will weep, deflate, and make your cake soggy within hours. The gelatin-stabilized version holds its shape for days while maintaining that light, airy texture we all love.
3. Macerate Your Strawberries Properly
Letting the sliced strawberries sit with sugar for at least 20-30 minutes draws out their natural juices and intensifies their flavor. However, don’t macerate them for more than 2 hours or they’ll become too soft and mushy. Drain excess liquid before adding them to the cake layers to prevent sogginess-but save that sweet strawberry syrup for drizzling over individual slices when serving!
4. Use the Alternating Method Correctly
When adding dry ingredients and buttermilk, always start and end with the dry ingredients. This technique creates the most tender crumb structure. The pattern should be: 1/3 dry, 1/2 wet, 1/3 dry, 1/2 wet, 1/3 dry. And remember-fold gently with a spatula once you start alternating; overmixing develops gluten and creates a tough, chewy cake instead of a tender one.
5. Check Your Baking Powder Freshness
Old or expired baking powder is one of the most common reasons for flat, dense cakes. Test yours by adding a teaspoon to hot water-it should fizz vigorously. If it doesn’t, replace it before attempting this recipe. Fresh leavening agents are essential for those tall, fluffy layers.
6. Chill Your Mixing Bowl for Better Whipped Cream
For the fluffiest stabilized whipped cream frosting, place your mixing bowl and beater attachments in the freezer for 10-15 minutes before whipping. Cold equipment helps the cream whip up faster and achieve maximum volume. Also, make sure your heavy cream is very cold-straight from the refrigerator is perfect.
7. Timing Your Assembly Matters
While you can refrigerate the finished cake for 2-3 days, the absolute best texture and flavor happens within the first 24 hours. The cake layers stay perfectly moist but not soggy, the strawberries maintain their texture, and the frosting stays beautifully fluffy. If you’re making this for an event, assemble it the morning of or the night before for optimal results. You can bake the layers 1-2 days ahead and store them wrapped tightly at room temperature, then assemble when you’re ready.
Storage and Reheating Guidance
Store your assembled Pioneer Woman strawberry shortcake cake in the refrigerator, loosely covered with plastic wrap or in a cake container, for up to 3 days. The whipped cream frosting requires refrigeration. Let slices sit at room temperature for 10-15 minutes before serving for the best flavor and texture. This cake is not freezer-friendly once assembled due to the fresh strawberries and whipped cream.
Pioneer Woman Strawberry Shortcake Cake Recipe
There’s something magical about combining fluffy vanilla cake layers with fresh, juicy strawberries and clouds of whipped cream frosting. This copycat Pioneer Woman strawberry shortcake cake recipe transforms the beloved summer dessert into an elegant layered masterpiece that’s perfect for celebrations, potlucks, or whenever you’re craving something truly special.
Ingredients
- ½ cup (113g) unsalted butter, softened
- ½ cup (118ml) neutral cooking oil
- 1½ cups (300g) granulated sugar
- 4 large eggs, room temperature
- 1 tablespoon vanilla extract
- 3 cups (375g) all-purpose flour
- 1 tablespoon baking powder
- ½ teaspoon salt
- 1¼ cups (296ml) buttermilk, room temperature
- 2 pounds (907g) fresh strawberries
- 3 tablespoons granulated sugar
- 1½ teaspoons unflavored gelatin
- 2 tablespoons cold water
- 2¼ cups (540ml) heavy cream
- ¾ cup (90g) powdered sugar
- 1½ teaspoons vanilla extract
Instructions
Preparing the Cake Batter
Step 1
Preheat your oven to 350°F (175°C). Grease three 8-inch cake pans generously with butter or non-stick spray, dust with flour, and line the bottoms with parchment paper rounds for easy release.
Step 2
In a large mixing bowl, combine the softened butter, neutral oil, and granulated sugar. Using an electric mixer on medium-high speed, cream together for 1–3 minutes until the mixture becomes light, fluffy, and pale in color.
Step 3
Add the room-temperature eggs one at a time, beating well after each addition to ensure proper incorporation. Add the vanilla extract with the last egg and mix until combined.
Step 4
In a separate medium bowl, whisk together the all-purpose flour, baking powder, and salt until evenly distributed.
Step 5
With the mixer turned off, add about one-third of the dry ingredients to the wet mixture, then gently fold with a rubber spatula. Add half of the buttermilk and fold again. Continue alternating, ending with the final third of dry ingredients. Important: Do not use the electric mixer during this step-overmixing will create a tough, dense cake. Mix just until you can no longer see dry flour; a few small lumps are perfectly fine.
Baking the Layers
Step 6
Evenly divide the batter among the three prepared pans using a kitchen scale for precision if desired. Smooth the tops with your spatula.
Step 7
Bake for 24–26 minutes, or until the cakes spring back when lightly touched and a toothpick inserted in the center comes out clean or with just a few moist crumbs.
Step 8
Cool the cakes in their pans for 10–15 minutes, then run a knife around the edges to loosen. Invert onto cooling racks, peel off the parchment paper, and allow to cool completely before assembling.
Preparing the Macerated Strawberries
Step 9
Set aside about ½ pound of the prettiest strawberries for decoration and cut them in half lengthwise.
Step 10
Hull and dice the remaining strawberries into small bite-sized pieces (about ¼ to ½ inch). Place them in a bowl, sprinkle with 3 tablespoons of granulated sugar, and stir to combine. Let them sit at room temperature while you prepare the frosting-they’ll release their natural juices and create a syrupy mixture.
Making the Stabilized Whipped Cream Frosting
Step 11
In a small bowl, sprinkle 1½ teaspoons of unflavored gelatin over 2 tablespoons of cold water. Stir until the gelatin is fully absorbed and the mixture looks like wet sand. Set aside to bloom.
Step 12
In a large, clean mixing bowl, combine the cold heavy cream, powdered sugar, and vanilla extract. Start mixing on low speed until the sugar is incorporated, then increase to high speed. Beat until the mixture starts to thicken but hasn’t yet reached stiff peaks.
Step 13
Microwave the bloomed gelatin in 5-second intervals until it’s completely melted and liquid (usually 10-15 seconds total). Be careful not to overheat. Let it cool slightly for about 30 seconds-it should be warm but not hot.
Step 14
With the mixer running on low speed, slowly drizzle the melted gelatin into the partially whipped cream in a thin stream. Once fully incorporated, increase the speed to high and continue beating until stiff, fluffy peaks form. The frosting should resemble the texture of Cool Whip and hold its shape beautifully.
Assembling Your Strawberry Shortcake Cake
Step 15
If your cake layers have domed tops, use a cake leveler or serrated knife to trim them flat for easier stacking. Place the first cake layer on your serving plate or cake stand.
Step 16
Spread a thin, even layer of whipped cream frosting on top of the first layer. Using a piping bag fitted with a round tip (or a spoon), create a frosting “dam” or border around the outer edge of the cake-this prevents the strawberry filling from squeezing out.
Step 17
Using a slotted spoon, add half of the macerated strawberries inside the frosting dam, leaving most of the excess juice in the bowl. Spread them evenly and add a little extra frosting on top if needed to create a level surface.
Step 18
Place the second cake layer on top and repeat the process with frosting dam, remaining macerated strawberries, and a bit more frosting.
Step 19
Add the third and final cake layer on top. Apply a light “semi-naked” coating of frosting around the sides of the cake, allowing some of the cake layers to show through for that rustic, homemade look that’s so popular.
Step 20
Pipe decorative swirls or dollops of frosting on top of the cake and arrange the reserved halved strawberries on the frosting swirls for a beautiful finish.
Step 21
Refrigerate the assembled cake for at least 15–30 minutes before slicing to allow everything to set. The cake can be refrigerated for up to 2–3 days, though it’s best enjoyed within 24 hours for optimal texture and freshness.
Notes
Store your assembled Pioneer Woman strawberry shortcake cake in the refrigerator, loosely covered with plastic wrap or in a cake container, for up to 3 days. The whipped cream frosting requires refrigeration. Let slices sit at room temperature for 10-15 minutes before serving for the best flavor and texture. This cake is not freezer-friendly once assembled due to the fresh strawberries and whipped cream.
Nutrition Information:
Yield:
8Serving Size:
1Amount Per Serving: Calories: 120
Common Queries and FAQs
Here, we’ve got you covered with some common questions about the Pioneer Woman Strawberry Shortcake Cake Recipe that people often ask.
Can I use frozen strawberries instead of fresh for this strawberry shortcake cake?
Fresh strawberries are strongly recommended for this recipe because they maintain their texture and don’t release excessive moisture. Frozen strawberries contain significantly more water, and even after thawing and draining, they’ll make your cake layers soggy and create a watery filling. If you absolutely must use frozen berries in an off-season pinch, thaw them completely, drain thoroughly in a fine-mesh strainer for at least 30 minutes, and pat them very dry with paper towels before macerating. Be aware the texture won’t be quite as firm and appealing as fresh berries.
How do I prevent my cake layers from sticking to the pans?
The triple protection method is your best bet: grease the pans generously with butter or non-stick spray, dust with flour (tapping out the excess), and line the bottom with parchment paper rounds cut to fit perfectly. This combination ensures easy release every time. Let the cakes cool in the pans for 10-15 minutes before attempting to remove them-if you try too early, they may break apart, but if you wait too long, they might stick. Running a thin knife or offset spatula around the edges before inverting also helps tremendously.
Why did my whipped cream frosting turn out runny or won’t hold its shape?
Several factors could cause this frustrating issue. First, make sure you’re using heavy cream with at least 36% fat content-anything lower won’t whip properly. Second, your cream must be very cold from the refrigerator. Third, don’t skip or reduce the gelatin-it’s absolutely essential for stability. Fourth, make sure your gelatin was fully melted and incorporated properly. Finally, don’t overbeat the cream after adding gelatin, as this can cause it to break and become grainy or separate. Stop mixing as soon as stiff peaks form.
Can I make this cake ahead of time for a party?
Absolutely! This recipe is quite make-ahead friendly with the right approach. You can bake the cake layers 1-2 days in advance, wrap them tightly in plastic wrap once completely cooled, and store at room temperature. Prepare the stabilized whipped cream frosting up to 24 hours ahead and keep it refrigerated in an airtight container-just give it a quick stir before using. The fully assembled cake can be refrigerated for up to 3 days, though it’s best within 24 hours. Macerate your strawberries no more than 2 hours before assembly to prevent them from becoming too soft.
What’s the difference between stabilized whipped cream and regular whipped cream?
Regular whipped cream is simply heavy cream beaten with sugar until fluffy, but it begins deflating and weeping (releasing liquid) within a few hours, making it unsuitable for layer cakes. Stabilized whipped cream contains gelatin, which creates a structure that holds its shape for days in the refrigerator without deflating or becoming watery. The texture remains light and airy like regular whipped cream, but with the staying power needed for decorated cakes. This makes it perfect for this copycat Pioneer Woman strawberry shortcake cake recipe since you need the frosting to support multiple layers and look beautiful for hours or even days.
My cake layers came out dense instead of fluffy-what went wrong?
Dense cake layers usually result from one of these common mistakes: overmixing the batter after adding the flour and buttermilk (which develops too much gluten), using expired or insufficient baking powder, not properly creaming the butter and sugar together (cream for the full 1-3 minutes until light and fluffy), using cold ingredients instead of room temperature, or overbaking. Also check that you measured your flour correctly-spoon it into the measuring cup and level off rather than scooping directly from the bag, which packs in too much flour. One cup of properly measured all-purpose flour should weigh 125 grams.
Can I substitute the buttermilk with regular milk?
While buttermilk contributes to the tender, moist crumb and slight tang that makes this cake special, you can create a substitute if needed. For every cup of buttermilk called for, mix 1 cup of whole milk with 1 tablespoon of white vinegar or lemon juice, stir, and let sit for 5-10 minutes until slightly thickened. This creates the acidity needed for the recipe. Alternatively, you can thin plain yogurt or sour cream with a bit of milk to pourable consistency. However, store-bought buttermilk will always give you the best results if it’s available.
How do I know when my cake layers are done baking?
Use the combination method for accuracy: First, the cakes should spring back when lightly touched in the center. Second, insert a toothpick or cake tester into the middle of each layer-it should come out clean or with just a few moist crumbs (no wet batter). Third, the edges should be pulling away slightly from the sides of the pan. Fourth, the tops should be golden and appear set rather than jiggly. Baking times can vary depending on your oven, so start checking at 22 minutes. Overbaking is worse than slight underbaking when it comes to keeping your cake moist.
Is there a way to make this recipe into cupcakes instead of a layer cake?
Yes! This batter makes excellent cupcakes perfect for picnics and parties. Line muffin tins with paper liners and fill each about 2/3 full. Bake at 350°F for 18-22 minutes until a toothpick comes out clean. You’ll get approximately 24 cupcakes from this recipe. Once cooled, cut a small cone from the top of each cupcake, fill with macerated strawberries, replace the top, and pipe the stabilized whipped cream frosting on top. Garnish with a fresh strawberry slice. These are essentially individual pioneer woman strawberry shortcake trifle recipe portions and are much easier to serve at large gatherings than cutting a layer cake.
What can I do with leftover stabilized whipped cream frosting?
Any extra frosting will keep beautifully in the refrigerator for 3-4 days in an airtight container. Use it to top fresh berries, dollop on pancakes or waffles, frost sugar cookies, fill cream puffs, or layer in parfaits with fruit and granola. You can also pipe it onto hot chocolate or coffee drinks for a special treat. Give it a quick stir before using if it has separated slightly during storage. Because of the gelatin stabilization, it maintains its fluffy texture far longer than regular whipped cream, making it incredibly versatile for other desserts throughout the week.
This copycat Pioneer Woman strawberry shortcake cake recipe brings together everything we love about classic strawberry shortcake in an impressive layered format perfect for any celebration. The combination of tender vanilla cake, sweet macerated strawberries, and clouds of stabilized whipped cream creates a dessert that looks as stunning as it tastes.
Whether you’re following this traditional strawberry shortcake cake recipe for a special occasion or just treating yourself to something wonderful, the result is always crowd-pleasing perfection. Now that you know how to make Pioneer Woman strawberry shortcake cake with confidence, you’ll have a go-to recipe that showcases fresh berries beautifully. So grab those strawberries, preheat that oven, and get ready to create a dessert masterpiece!
You can also follow us on Pinterest, and YouTube for more delicious updates and kitchen inspiration. Your feedback and support mean the world to us!